Vista’s employee surveys feature makes it simple to poll your employee base about any topic, including their exposure to COVID-19. This article shows how to create a COVID-19 survey that your employees can fill out in Vista self-service.
Required Security Access
You’ll need semi-administrative security access to create a survey in Vista including the ability to access the Human Resources application and full access to the following security options:
- Surveys (ID: 8300)
- Qualifying Questions (ID: 65150)
- Survey Questions (ID: 8301)
- Surveys – Results (ID: 8303) (Optional)
Your self-service employees, however, only need full access to the self-service option Employee Surveys (ID: 700) to fill out surveys. Optionally, self-service employees can also be granted access to Surveys – Results (ID: 8303).
Building a Survey
The first step in building your survey is to create the overall survey record. Once this is done, you can create the individual survey questions and assign them to the survey.
The Surveys setup table allows you to create of the overall survey record, to which you will later assign the questions.
- Log in to Vista and access Human Resources from the application menu.
- Click the Setup Tables button on the functions bar.
- Click the Surveys link in the options pane.
- Click the New link on the right side of the Surveys table to create a new survey (via the Surveys dialog box, shown below).
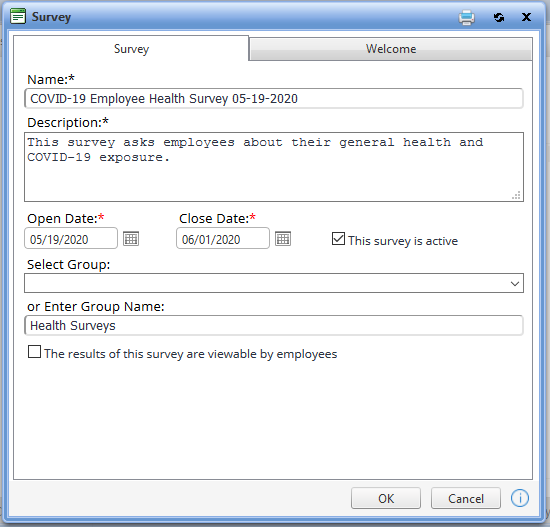
You’ll need to populate the required fields (indicated by an asterisk) including the survey’s name and description. You can put the survey in an existing group or type a new name. Be sure to check the “This survey is active” box but leave the “The results of this survey are viewable by employees” box unchecked. The Open Date is just for your reference, but once the Close Date passes, this survey won’t be fillable anymore.
You may wish to have your employees fill out this survey more than once. After the survey is created, Vista provides a Copy feature that lets you duplicate the survey with minimal effort. (If you intend to do this, you may want to put a date in the title of your survey.)
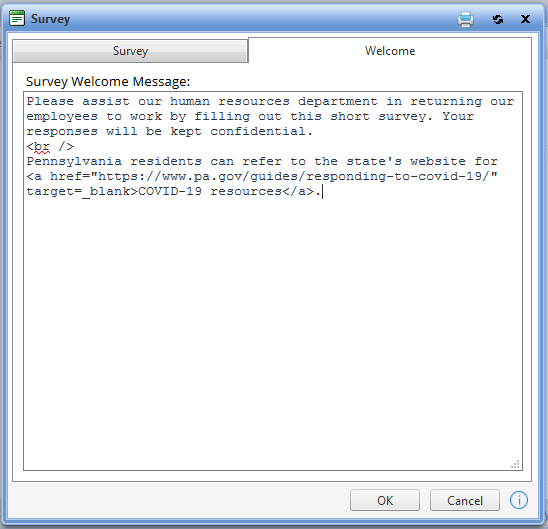
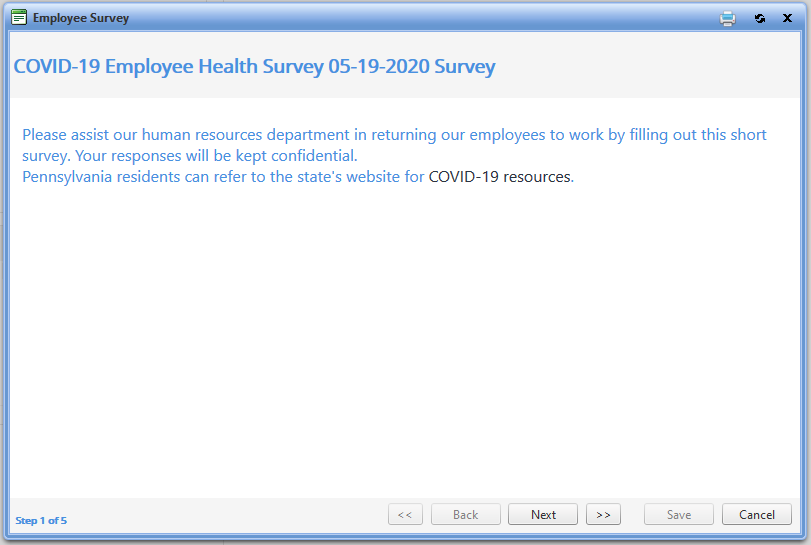
Type the purpose of the survey and provide any additional instructions in the Welcome tab. Employees will see this message when they open the wizard. You can use HTML-formatted text here, including hyperlinks.
Create Survey Questions
Next, we’ll create questions for our survey. These questions will be presented one at a time when an employee walks through the survey.
- In the Code Tables area of Human Resources, search for “Survey Question Categories” (cdsqcat) and add a new Category that you’ll use to group question types. (E.g., Enter a new category of “H” for “Health-related” questions.)
- In the Setup Tables area of Human Resources, click the Survey Questions link in the options pane.
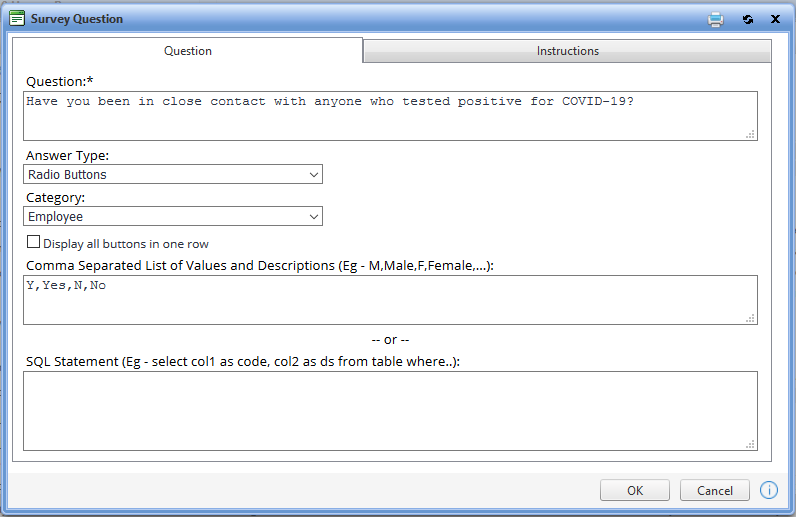
- Click the New link on the right side of the questions table to create a new question.
Vista provides numerous ways to collect question responses—check boxes, selection boxes, radio buttons, text areas, and more. The contents of this dialog will change depending on the selected Answer Type. In the screenshot below, with Radio Button selected, you can supply a comma-separated list of values and descriptions.
When creating survey questions, consider the following tips:
- The effort required by employees to fill out a question should be minimal. For instance, don’t require them to type “Yes” for a simple yes/no question; use a radio button or a checkbox.
- If you intend to review individual survey responses, consider restricting questions to yes/no values or selection box-driven responses so you don’t have to read through responses. (This also makes reporting much easier.)
You can optionally fill out the Instructions tab if instructions are needed for answering the question. This box allows HTML-formatted text; you can include hyperlinks to external resources.
When finished, click OK to save your new survey question and close this dialog box.
Repeat this process above for as many questions as you have for your survey.
Add Questions to Your Survey
It’s time to attach the questions to your survey.
- Click the Surveys link in the options pane in the Setup Tables area of Human Resources.
- Select your survey from the list.
- Click the Questions tab in the edit dialog.
- Click the New link to add a new question.
You can change the question’s display order (lower numbered questions will show first when the employees walk through the surveys wizard) and determine if the question is required.
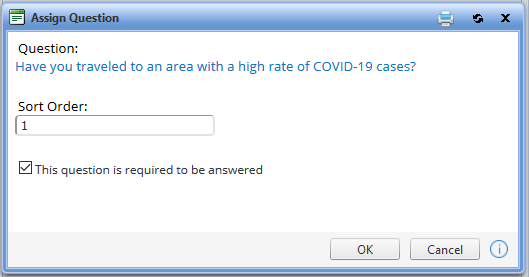
Repeat this step until you’ve added all of your questions to the survey.
Deploy the Survey
Your survey will become visible to employees immediately upon deployment. It’s a good idea to prepare an email to your employees to notify them that they need to log into Vista to complete the survey.
To deploy your survey:
- Access your survey setup in the Setup Tables area of Human Resources.
- Click the Employees tab in the edit dialog, then click the Employees link on that tab.
Vista allows you to deploy surveys by company, organization, location, team, or individually. To deploy company-wide, as illustrated in this screenshot, just select a company.
Selecting multiple entities, such as a company and organization, will have an additive effect (e.g., will include all employees from that company or organization). Note only HR-active employees will receive surveys.
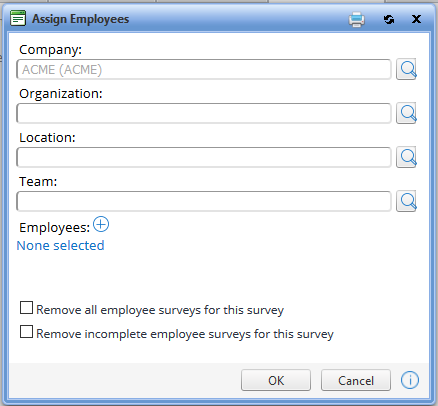
This screen also allows you to remove employees from the survey and delete incomplete surveys.
Click the OK button to deploy the survey after making your selections. Afterwards, the Employees tab on the survey edit dialog will list the employees who received it.
Tip: You may wish to initially deploy the survey only to yourself so you can test it.
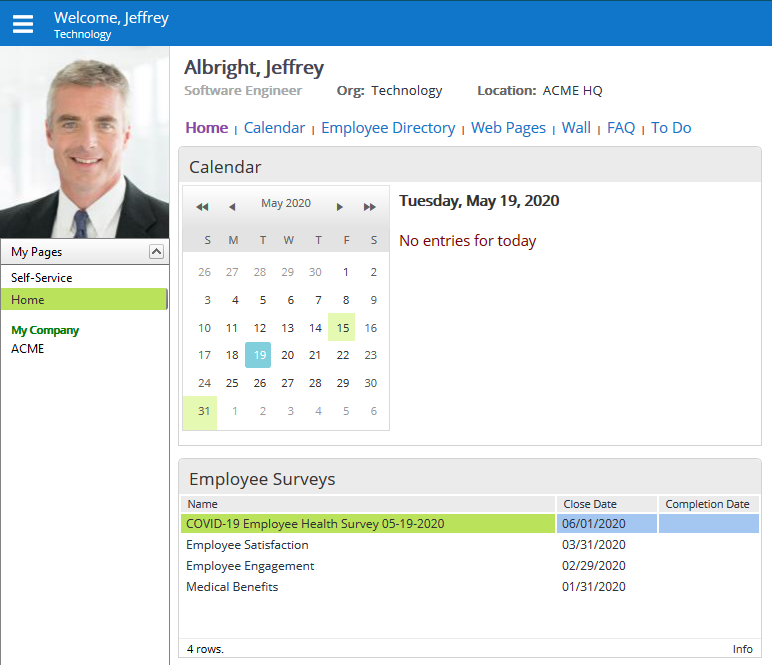
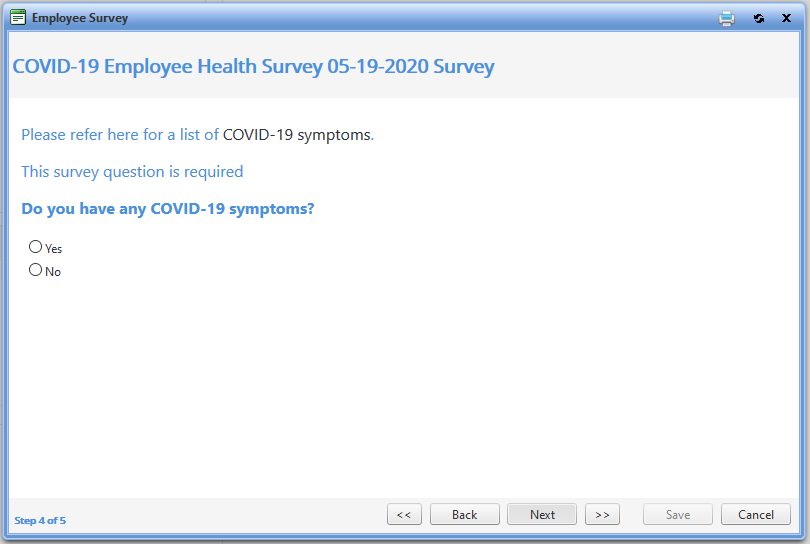
After logging in to Vista self-service, employees can access the survey on their Home page in the Employee Surveys control.
Clicking the survey opens the wizard. The wizard saves responses as employees progress through the steps, so they don’t have to fill it out all at once. Once they reach the final screen in the wizard and click Save, they won’t be able to change their responses. (They will still be able to access the survey and see their responses provided you opened security to that, however.)
Reviewing Survey Results
You can view statistics and individual employee responses to the survey in the survey setup.
- Access your survey setup in Human Resources.
- Click the Results tab in the edit dialog.
Here, you can see general statistics on your survey responses.
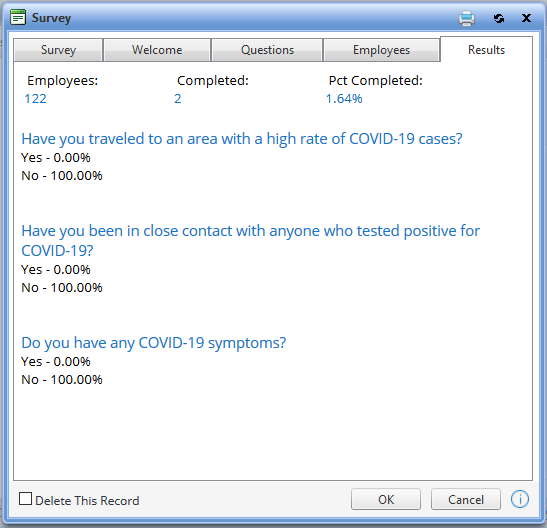
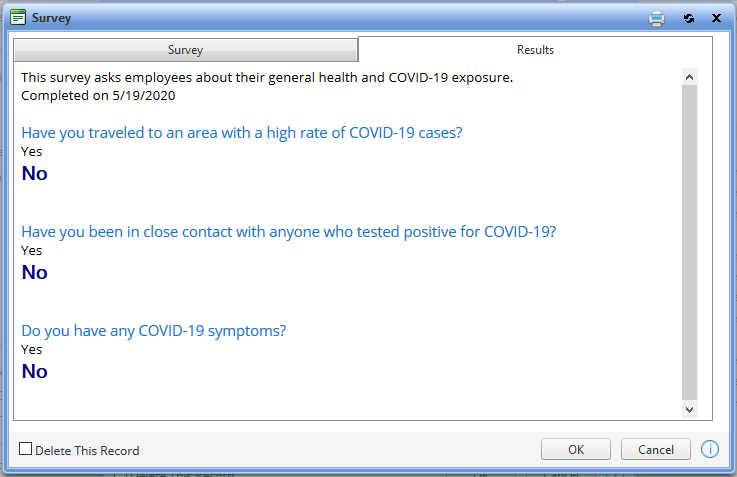
To see individual employees’ responses, click the Employees tab. Any employee who completed the survey will have a completion date.
Selecting any employee allows you to review their general comments (under the Survey tab) and question responses (Results tab).
Remember, if you need to deploy this survey more than once, you can copy it, so you don’t have to repeat the setup work. To copy a survey, access your survey setup and click the Copy button under the Survey tab.
PDS Professional Services Assistance
For survey customization beyond what was detailed above or for general self-service assistance, you’re always welcome to put a request into our Service Center. Examples of survey-related services that PDS Professional Services can provide include:
- Automated survey deployment, allowing you to deploy a COVID-19 survey (or any other) on a regular basis (daily, weekly, and so on). We can also automate adding surveys to new hires and in other situations.
- Automated email alerts to remind employees to complete surveys.
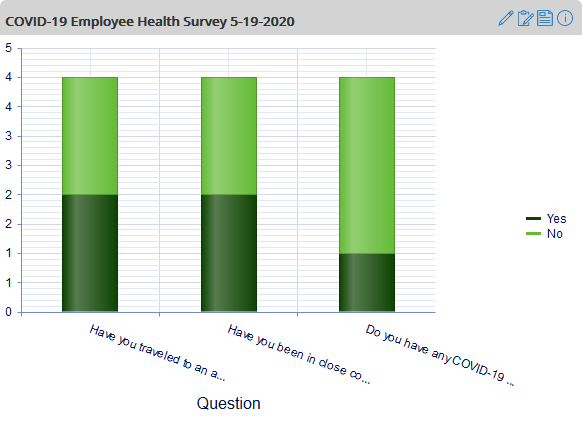
- Reporting of any kind, including Crystal Reports and Vista Analytics to show survey results exactly as you want to see them.
Here’s an example analytic that shows results of Yes/No questions in a Survey:
Additional documentation about employee surveys is published on the Vista 7 Quick Guides page of the PDS Support Center.
Charles P. Jefferies
Technology Consultant | PDS
cpjefferies@pdssoftware.com